Ever sent an email and felt that pang of worry, wondering if it vanished into the digital ether? Waiting on a reply for a critical work proposal or a personal message can leave you hanging. That’s where Outlook’s read receipt feature comes in, like a little wave from the recipient saying, “I saw your email!” Knowing how to request a read receipt in Outlook or how to set up read receipts in Outlook can ease that stress.
This guide walks you through every step, from understanding what does request a read receipt mean in Outlook to fixing issues when Outlook read receipts don’t work. Let’s make your email game smoother, less nerve-wracking, and maybe even a bit fun. Ready to jump in?
Understanding Read Receipts: Why They’re a Big Deal
So, what does request a read receipt mean in Outlook? It’s a nifty tool that tells you when someone opens your email, like a digital “message received” nod. Whether you call it an Outlook email read receipt, read confirmation, or just read receipt in Outlook, it’s a game-changer when you need to know your email landed. Imagine you’re waiting to hear back on a project pitch or checking if your friend got your dinner plans. That’s where Outlook read receipts come in clutch.
Why bother? At work, an Outlook read receipt request lets you track who’s seen your urgent emails, like a contract or meeting invite, so you’re not left playing the guessing game. On a personal note, it’s perfect for confirming your family group chat got read. Here’s the catch, though: recipients can choose not to send the read receipt on Outlook, so it’s not a guaranteed deal. Figuring out when to use this feature—and when it might seem pushy—is the key to getting it right.
Step-by-Step: How to Request a Read Receipt for a Single Email in Outlook
Want to know how to add a read receipt in Outlook for just one email? Maybe it’s a job application or a key client follow-up. Here’s how to request a read receipt in Outlook for that one-off message. It’s super simple, whether you’re using Outlook 365, the desktop app, or the web version.
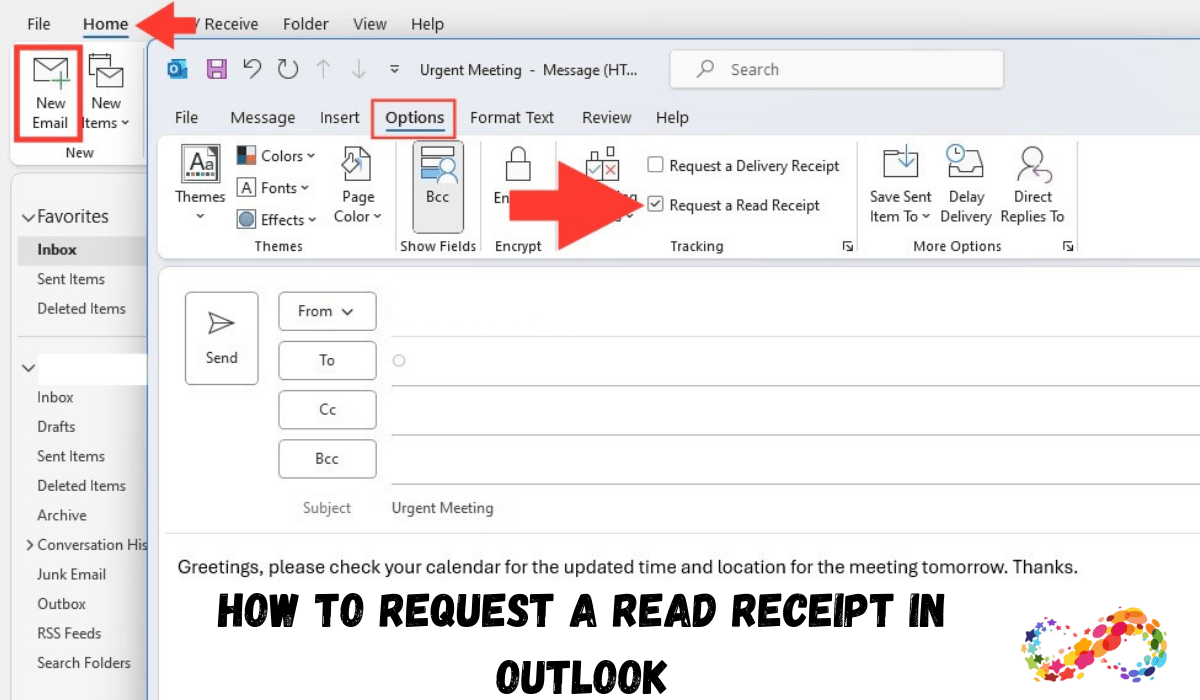
In the Outlook desktop app, start by opening Outlook and clicking “New Email” to draft your message. Fill in the recipient, subject, and content as usual. Then head to the “Options” tab at the top of the compose window. In the “Tracking” section, you’ll see options for “Request a Delivery Receipt” to confirm it hit their inbox and request a read receipt to know when it’s opened. Check the request a read receipt in Outlook box. Want both? Select the delivery option too. Hit “Send,” and your Outlook read receipt request is ready to roll.
For Outlook on the web, it’s even easier: while writing your email, click the three dots for more options and select request a read receipt. On a Mac, go to the “Options” menu in the compose window, then choose “Request Receipts” and pick “Read Receipt.” Wondering where is the read receipt in Outlook? If you don’t see it, try right-clicking the ribbon, selecting “Customize the Ribbon,” and adding Tracking tools. One thing to note: read receipts in Outlook work best with Exchange or Microsoft 365 accounts. POP or IMAP accounts might give you trouble. Now you’re set to send a read receipt in Outlook for those must-know emails.
Setting Up Read Receipts for All Your Emails in Outlook
If you’re constantly curious about who’s reading your emails—like in sales or project management—you might want to set read receipt in Outlook for every message. Here’s how to set up read receipts in Outlook so you don’t have to check that box every time.
In the Outlook desktop app, click “File” in the top-left corner to open the menu. Choose “Options,” then select “Mail” from the sidebar. Scroll down to the “Tracking” section. Under “For all messages sent, request,” check the box for read receipt confirming the recipient viewed the message. Click “OK,” and now every email you send will carry an Outlook read receipt.
For Outlook 365 or the web app, setting defaults for outgoing read receipts for Outlook isn’t as direct, but you can control how you handle incoming requests. Go to Settings, then Mail, and find Message handling to choose whether to always send a response or get prompted each time. Mac users, head to Preferences, then Email, and select Receipts to set your defaults.
Here’s a tip: requesting read receipt in Outlook for every email might annoy some folks, so use it sparingly. You don’t want to be the one flooding inboxes with read receipt on Microsoft Outlook requests. This setup answers how to turn on read receipts in Outlook for consistent tracking.
Adding, Removing, and Managing Read Receipts in Outlook
Outlook’s got plenty of flexibility for how to add read receipt in Outlook or adjust settings. For a single email, you can add read receipt Outlook as described above or remove it by unchecking the box before sending. Want to turn off Outlook request read receipt for all emails? It’s simple: go back to File, then Options, then Mail, and find Tracking. Uncheck the read receipt option under defaults and click “OK” to save.
You can also manage incoming read receipt requests in Outlook. In the Tracking section, pick “Never send a read receipt” for privacy or “Ask each time” to stay in control. This lets you keep things professional—use Outlook read confirmation for important email threads but skip it for casual chats to avoid seeming overbearing.
Troubleshooting Common Problems with Read Receipts in Outlook
Sometimes read receipts on Outlook don’t work like you’d hope. Maybe you’re not getting that Outlook mail read receipt even though you’re sure the email was opened. The issue? Recipients can decline to send the read receipt in Outlook or have their settings on “never send.”
You might also run into other snags. For example, compatibility issues can pop up since Microsoft Outlook read receipt works best with Exchange servers, and non-Microsoft clients like Gmail might not support them. If you’re the recipient and not seeing a prompt, check your Tracking settings to make sure you’re not set to “Never send.” Sometimes, server lag can delay Outlook reading confirmation too.
Here’s how to sort it out: send a test email to yourself to check how to get a read receipt in Outlook. Make sure Outlook’s updated to avoid bugs. If the web or mobile app’s acting up, try the desktop version for better reliability. For work accounts, loop in your IT team if read receipts Outlook keep misfiring. These steps will help you nail how to get read receipt in Outlook and keep those read receipts for Outlook on track.
Best Practices for Using Read Receipts Effectively
To make read receipts in Outlook your friend without ruffling feathers, use them wisely. Save how to request read receipt on Outlook for emails that need a response, like meeting plans or deadline reminders. Pair them with clear, friendly subject lines and polite wording to up the odds of getting that Outlook confirm receipt.Don’t lean on read receipt Outlook as your only follow-up strategy—some people disable how to receive a read receipt in Outlook for privacy. Think of it as a helpful extra, not a must-have, and combine it with direct communication to keep things warm and professional.
Frequently Asked Questions About Read Receipts in Outlook
Q: How do I know if someone has read my email in Outlook?
You’ll get a notification email with the time they opened it if they send the read receipt on Outlook. Check the original in Sent Items for tracking updates.
Q: Can I request a read receipt in Outlook for all emails?
Yes, go to File, then Options, then Mail, and check the read receipt box in Tracking to include it automatically.
Q: What if a recipient doesn’t send a read receipt on Microsoft Outlook?
Don’t assume the worst—follow up politely. They might have opted out or missed the prompt.
Q: Does requesting read receipt in Outlook mean they have to confirm?
Nope, it’s their call to send the Outlook read recipt or not, depending on their settings.
Q: How do I disable read receipts in Outlook?
Uncheck the read receipt box in the compose window for one email, or turn off defaults in Options, then Mail, then Tracking. For incoming requests, set to “Never respond.”
Q: Is a read receipt confirmation the same as a delivery receipt in Outlook?
Not quite—a read receipt in Outlook confirms the email was opened, while a delivery receipt means it reached the inbox.
Q: What versions of Outlook support read receipts for Outlook?
Most versions—desktop, web, Mac, and Outlook 365—support how to add a read receipt on Outlook, though features might differ slightly.
Wrapping It Up: Make Read Receipts Your Email Ally
Outlook read receipts are a simple yet powerful way to cut through email uncertainty, whether you’re requesting a read receipt in Outlook for a single message or setting up how to request read receipt in Outlook for all emails. We’ve covered the essentials: how to do a read receipt in Outlook, how to set read receipt on Outlook, and how to enable read receipts in Outlook when things go sideways. Use them thoughtfully, and they’ll help you stay on top of your inbox without stepping on toes. Now go take charge of those emails!